|
Author
|
Message
|
|---|
Anon
Deleted
Posts :
Location :
Status : Offline
|
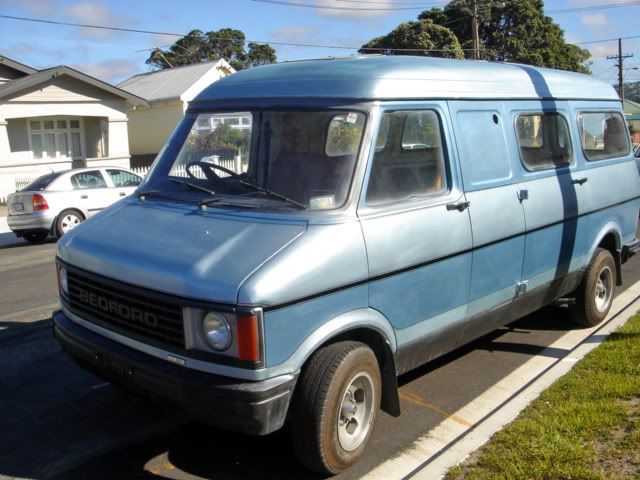
PHOENIX REINCARNATES.
Phoenix, my original CF, I had to let go when we moved house. I gave him to a friend who had a friend who wanted some parts.
The new van needed some back doors, and I bought a good pair off the internet. When I went to collect them I burst out laughing. They were my old ones off Phoenix. They had changed hands a couple of times and it cost me $50 to buy my own doors back!
I'm enjoying driving the Beddy, and have already had two offers to buy it, but cant wait till I can get back to working on Boudica.
----------------------
|
 Sat 08 Sep 2007 @ 04:51 Sat 08 Sep 2007 @ 04:51
|    |
Anon
Deleted
Posts :
Location :
Status : Offline
|
;D Right!!! That white thing has taken too much time already!
Its not finished , but it will have to wait.
Boudica needs to be operating by the new year.
A belated thank you for your messages of support.
I haven't touched her for almost 2 months and the rust is already starting to get a hold.
This weekend will be good weather, and I am going to prepare as much of the body as I can, and paint her using rattle cans.
I can't do the roof or the back door, as they require heaps of work yet, but I have a desperate need to see some progress.
"Watch this space".
----------------------
|
Fri 09 Nov 2007 @ 08:04
| |
Anon
Deleted
Posts :
Location :
Status : Offline
|
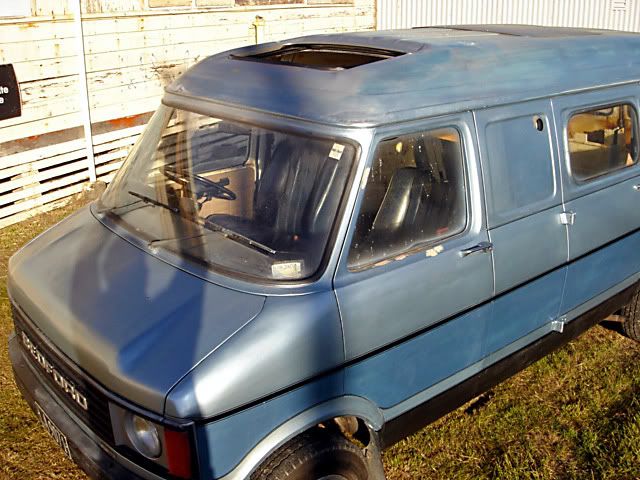
I have the front and drivers side painted. It used far more paint than I thought. This makes painting with rattle cans quite expensive, but still a lot cheaper than paying someone else to paint it.
She is looking good in silver and blue metalic, but I didn't realise that I had chosen Ford colours! .....Oh well, I'm not changing it, but I hope this doesn't make it rust quicker.
Shame I have to go to work, as I'm busting to do the other side now.
----------------------
|
Sun 11 Nov 2007 @ 19:57
| |
Anon
Deleted
Posts :
Location :
Status : Offline
|
I ordered some more paint this morning, and ended up with a short day, so I had time this afternoon to put the body stripes on.
Boudica is looking every bit as good as I hoped, but there is some more detailing to be done, and then I will post a photo.
Thanks for your support wullie d.
----------------------
|
Mon 12 Nov 2007 @ 10:23
| |
Anon
Deleted
Posts :
Location :
Status : Offline
|
I have one of those guess-your-speed Bedford speedos, so I bought a full set of smiths gauges out of an XJ6. They arrived yesterday. A job for a rainy day when everything else is done. I hope I can get the ratio sorted. Holden give you a choice of drivewheels for the gearbox end of the speedo cable, but finding the right one now might be a bit of an act.
Another fine weekend......I have painted the other side, and will do the detailing and stripes tomorrow if I get time.
The white van got p***ed off with me and blew its radiator! I can't get it fixed in the weekend, and I need it for work on Monday, so I will have to take the radiator out tomorrow and see if I can solder it up.
This will take away time I need to spend on Boudica, which I am sure was the intention!.....Its worse than having kids. 
I took my expensive disaster mirrors off to paint the doors, and the van looks so much sleeker without them. So I have bought a couple of cheap (screw to the window corner) mirrors off a Toyota or something. This should not be too bulky, and I can even hook up the electric controls if I want to get that carried away.
Well I've had my break now. I'll go back outside and see what else I can get done.
----------------------
|
Sat 17 Nov 2007 @ 03:41
| |
Anon
Deleted
Posts :
Location :
Status : Offline
|
Just for you Wullie D. but the paint job is not yet finished.
----------------------
|
Mon 19 Nov 2007 @ 08:08
| |
Anon
Deleted
Posts :
Location :
Status : Offline
|
Colour Troubles.
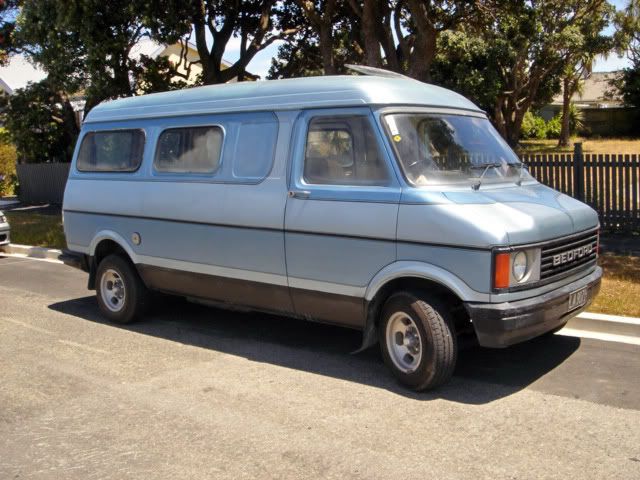
I painted this with about $300 of rattle cans, and then my wife said she wouldn't be seen dead in it!
Well it's not that bad, but I'm not happy with it either, so all the blue above the heavy line is going, and then I'll see what it needs.
I have altered the shapes and lines many times in the last few weeks, and
it seems I have to make every possable mistake before I get it right.
I still have to finish constructing the back door as it is not strong enough yet, and I have given up on the large windows because that would have been time consuming, and I want to get on the road. There will however be new windows fitted tight into the body recesses.
----------------------
|
Sun 16 Dec 2007 @ 10:32
| |
Anon
Deleted
Posts :
Location :
Status : Offline
|
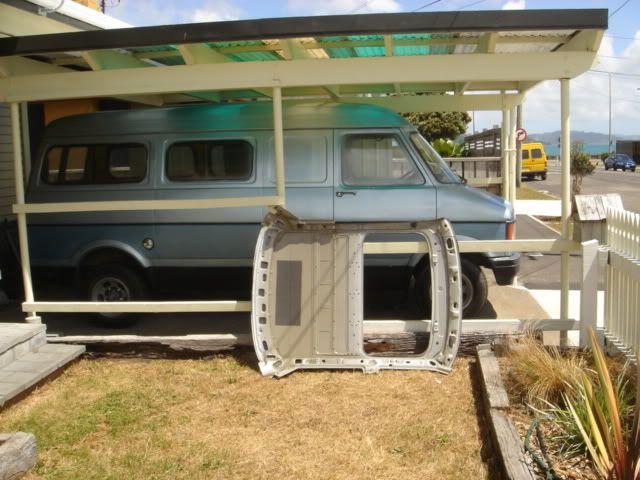
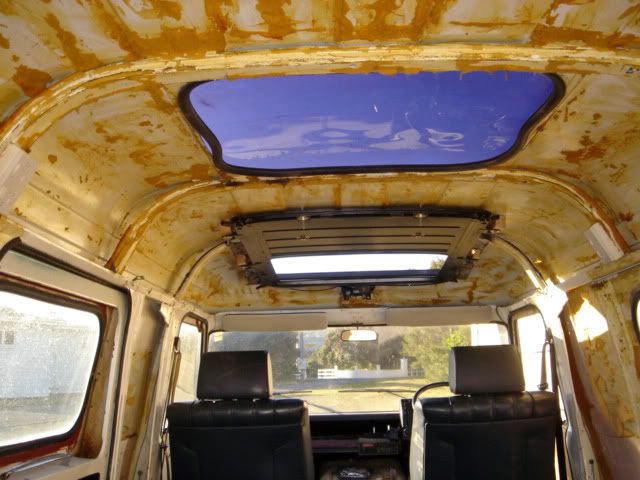
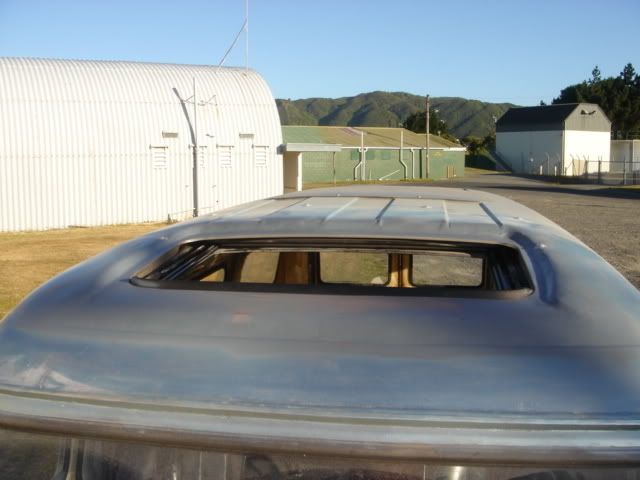
SUNROOF
Oh Boy!! Have I been having fun...NOT!
I really want my Beddy to be a convertable, but that's just TOO hard.
So I was determined to have a large, functioning sunroof.
I wrecked a BMW a year ago and saved the roof to fit into the van, but later decided that as the sunroof was not glass I would use something else.
I fitted a small tilt-top that I had, but that was too small, too fiddly to open right up, and I got it crooked which always annoyed me.
So I bought a Honda Prelude sunroof off trademe, and six months later it still has not arrived, but that's another story.
I had almost given up when I discovered a cheap Rover (Honda) roof with a large sliding sunroof in it. So I bought it.
Fitting this has been the trickiest job yet.
It would have been OK if I could have just cut the van roof and welded in the Rover one, but it was a bit thick at the edges, where the strength was. I didn't want to add to the height of the Bedford by putting it on top of the roof,and I didn't want to cut the rib strengthening the van roof, because although I could have made it strong again, I have to get this all certified by an engineer who may not like that cut away.
So I had to cut the whole thing to bits and rebuild it into Boudica.
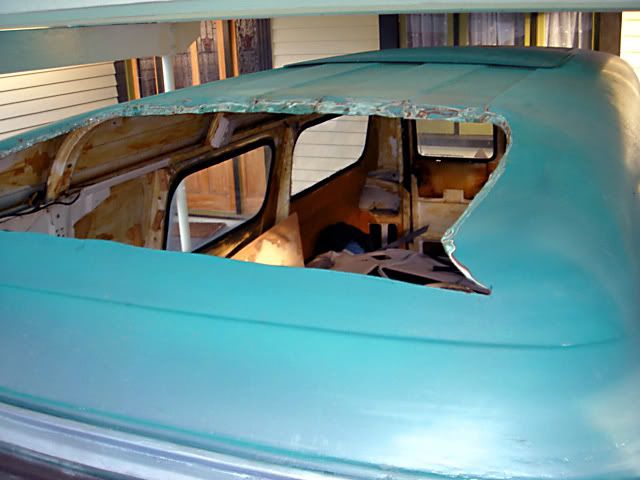
When the Rover roof got reduced, it was very flimsy. The steel is half the thickness of Bedford steel, and I have had to fit it all together very precisely so that it slides well and doesn't leak.
It took four days, and probably most of that time was spent thinking and measuring.
I was worried that it may look odd, but am very pleased with how it looks now, and there is no wind or noise when being driven.
I still have to sort out the wiring, and the drain hose. I think instead of running it into the gutter, I might take it back and down through the floor.
SEATS
When I was welding the sun roof in, there were a lot of sparks and splatter which resulted in a small fire!!!!
I have had to install the leather BMW seats next. LOL....
To get the height correct I needed to lower the seat boxes about 40 mm, otherwise I would have limited "up" visability, and getting in would have been difficult for my knees.
BATTERY
Someone previously, had put the battery under the passenger seat, so at the moment it is sitting on the floor. (not a good idea) I will either put it back where it was, as the tank has now gone, or else build a box for it on the passenger's step.....I can imagine being trapped in an inverted van, and having sulphuric acid running everywhere.
In fact I have just decided; its going back underneath!
----------------------
|
Tue 01 Jan 2008 @ 23:40
| |
Anon
Deleted
Posts :
Location :
Status : Offline
|
INTERIOR LINING
I didn't know I would be spending all this time on the roof and seats, so I bought seven metres of carpet which I was going to fit into the back these holidays. It's black with a grey fleck, and it's rolled up in the passage at this time, and Anna keeps tripping on it and getting more anti-bedford.
I should go back to work tomorrow, but I may have to have a tidy up around here instead; mow some lawns, and put the carpet roll in the van, and get rid of the old seats, bits of steel, and other Beddy stuff that adds character to the place or lowers the tone of it, depending on your point of view.
----------------------
|
Wed 02 Jan 2008 @ 11:26
| |
Anon
Deleted
Posts :
Location :
Status : Offline
|
Disc Brakes
I went back to work yesterday, but they were not ready for me so I have three more days off.
I dug out the rusty old Holden disc brakes that I bought a few months ago. I stripped them down and gave them a good clean up.
There are two ways to get Holden hubs to fit Bedford stub axles; one is to turn down the axle to fit the Holden bearings, and the other is to turn out the hub to fit the Bedford bearings. I checked to see that the axle strength had not been compromised, and it was OK. So I bought some new pads.
Unfortunately the bleeding nipples were seized, I managed to release one, but the other snapped off. Today I have to get it out or try to find another caliper body.
This looked like such an easy conversion........
----------------------
|
Fri 04 Jan 2008 @ 19:55
| |
Anon
Deleted
Posts :
Location :
Status : Offline
|
I tried to purchase another caliper today, but none readily available locally. So I drilled the old one out, tapped the hole, and will use a modified bolt in it.
I'm sure it will be alright, but the certifier may make me get another.
----------------------
|
Sat 05 Jan 2008 @ 08:26
| |
Anon
Deleted
Posts :
Location :
Status : Offline
|
More Brake Stuff.
The bolt was sloppy in the new thread, and I didn't like it, so I have bought other calipers via internet. They have not arrived yet. They are the later aluminum ones which are a bit less bulky, which is good as the other ones had spring clips which barely cleared the wheels.
The only problem, I believe, will be the need to take them off the stubs to bleed them as the nipple will sit too low when connected, therefore trapping air.
Rear bumper.
I got bogged down on this job some months ago, so I left it for later.
Later was today.
I spent the day completing this project; filling in the spaces in the bumper/step, and extending the bumper to meet the step. A fiddly job.
But it looks complete now, and quite tidy. A bit of black paint tomorrow, and I'll put a photo up.
Back Door.
It lifts up, it looks impressive, but it has problems.
I was going to put a deeper window in, which would look better I think, but I cut away too much strength and it flexes. I could improve it, but it has a designed in rust problem at the top of the number plate recess. It also is not strong enough where the struts push it up and the frame is bending.
It will be easier and simpler and stronger to start again, incorporating the lessons learned from the first one.
I have two good doors that I bought for the white van and never used, so I have stripped them down and cut them about, all ready to weld up tomorrow.
Instead of cutting the centre pillar out, I have only cut the skin, and folded the pillar sides in so they can be welded together. When the glass is in, and I have the tint on, I don't think it will be clearly visable. Also I have left the window at the same depth, which leaves all the original strength in place.
I now know where to strengthen the door with angle iron, and will glue a block of wood between the inner and outer skins at the sides of the door where the hinges and the struts do their thing, and the bolts go through.
Instead of creating a number plate recess in the door, I have a ready made one from a Honda prelude which I can weld into the centre of the door. This should be stronger, and will not have the rust problem I had with the exposed edges of steel above the recess.
photos to come.
----------------------
|
Sat 12 Jan 2008 @ 09:44
| |
Anon
Deleted
Posts :
Location :
Status : Offline
|
Happy New Year everyone..
Cricky jeff-do you think you'll get it finnished sometime in March?-i should be heading you way by then for the mainland.
I been doing a lot of work on mine,replacing the carpet,made the shower wider,fit a rangehood and many other fix up jobs.
|
Sun 13 Jan 2008 @ 08:06
| |
Anon
Deleted
Posts :
Location :
Status : Offline
|
Yes, I think so. It feels like I'm on the home stretch now.
There will always be jobs to do, but I'm hoping to be using her by then.
The back door is the last big job, and that should be fitted by next weekend.
The brakes should only be a days work.
The diff is still on the way from USA, but I'm getting someone else to fit that...sometime in February I think.
The windows will take one day, whenever I book it in.
The mirrors to fit.
Battery to fit.
And then I have to get her certified...I don't like that bit.
And the rest is just tidying up, mostly inside.
I will be away Easter, but if your coming down any other time do call in, have a meal...whatever.
----------------------
|
Sun 13 Jan 2008 @ 09:11
| |
Anon
Deleted
Posts :
Location :
Status : Offline
|
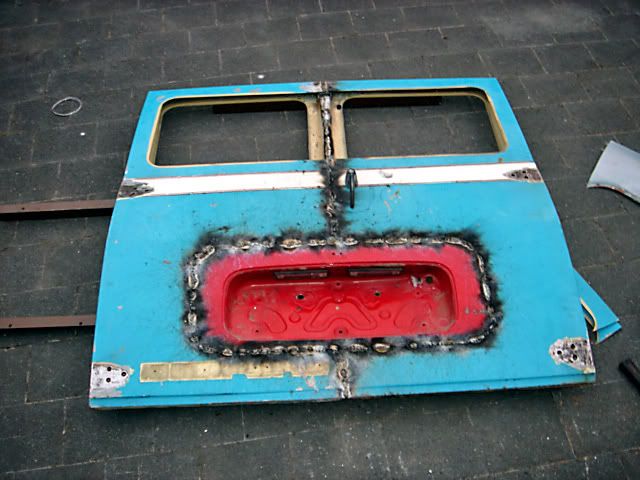
The new rear door. Don't look too closely at the welding. I am getting better!
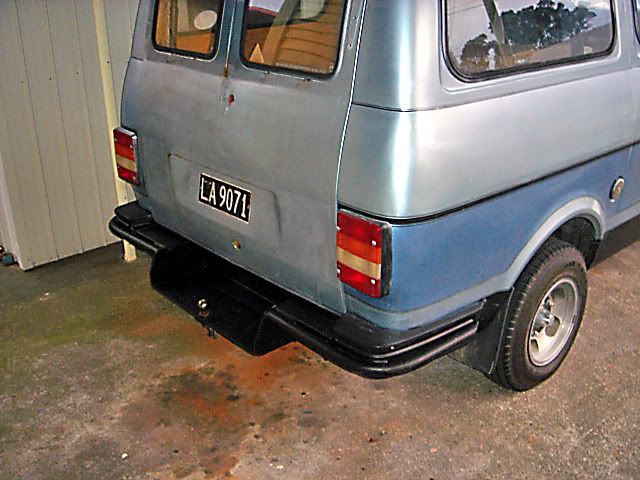
The step is a bit dark in this photo, but you can see the rust well under way on the top edge of the number plate recess.
----------------------
|
Sun 13 Jan 2008 @ 09:21
| |
Anon
Deleted
Posts :
Location :
Status : Offline
|
 Holy Booker!! Holy Booker!!
Thats sure is some welding job for a novice!-but it looks good tho.I hope you welded it from the inside as well jeff.
Good luck with your certifier-i know how you feel,i been there & done that when i did the diesel/gearbox.
|
Sun 13 Jan 2008 @ 23:56
| |
Anon
Deleted
Posts :
Location :
Status : Offline
|
Back Door
I can't believe how long this is taking! I have spent seven days on it so far and a few more hours tomorrow to finish.
I overheated the door when I was welding it and the skin distorted, resulting in an awful heap of bog having to go into it to make it straight again.
But this one is solid. I have welded a frame to the inside.
I also had to reset the lifters, as the way they were, pulled the door shut too hard. The brackets I made for them were a bit weak also, so I made new ones that will never bend, and have set them about another two inches further into the van. It closes nice now.
One problem I saw was when the door was up and it was raining, all the water would have run back and dripped into the back of the van. I had to build a gutter near the top of the door, to hold the water back and run it to the sides. There may be a problem with that yet; no doubt I shall find out.
The door handle I have turned to a horizontal position, but left it where it was. It looks a bit out of balance there, but it would take another two days work to build a strong system further down the door, so it can stay for now, and I will move it later if it worries me enough.
My daughter has the camera; I will put up a photo or two when we get it back.
Disc brakes,
I now have all the bits I need *crosses fingers* to install the big ventilated Holden discs. This should happen this weekend also.
I'm told that they won't work any better than the old drums, but they give less trouble, and with a hilly country, and an automatic gearbox there will be less chance of them fading away on the downhills. Not that this has been a problem so far with the other Bedford.
Automatic Gearbox.
Oh yes.....I forgot to mention that the five speed I was buying never eventuated.
In the meantime I have come to like the auto again, so it can stay.
Coupled to the 2.8 to 1, Ford nine inch diff I have on order, we should get very good economy.
----------------------
|
Fri 25 Jan 2008 @ 12:23
| |
Anon
Deleted
Posts :
Location :
Status : Offline
|
hi jeff looking good mate where did you get the rear bumper from or did you make it yourself;]
----------------------
|
Fri 25 Jan 2008 @ 18:28
| |
Anon
Deleted
Posts :
Location :
Status : Offline
|
Jeff wrote:
I overheated the door when I was welding it and the skin distorted, resulting in an awful heap of bog having to go into it to make it straight again.
tip for next time, if you do manage to overheat the panel , take a blowtorch and gently heat the distortion then quench the panel with a wet cold rag. this will shrink the panel and tighten the distortion back up. do it slowly and evenly .ade
----------------------
|
Fri 25 Jan 2008 @ 20:00
| |
Anon
Deleted
Posts :
Location :
Status : Offline
|
Thank you Stumpy. I knew there was a way, but not what it was!
I hope there won't be a next time...LOL
The rear bumper setup sort of grew, Wullie D.
First there was a towbar.
Then someone built a step on it , and added a tubular steel bumper with vertical bars on the corners.
Then I bought it, cut off the vertical bars, and tidied the whole thing up with an angle grinder.
Then I fitted some CF2 corner bumpers between the bumper and the van. These had been cut short, so I had to add to them with steel.
Also I had to extend the step forward, and rise it up to connect under the doors.
Rear Door
I finished it this weekend.
I bogged over the gate hinges that came down the sides, and bogged along the top, under the new gutter. This has recessed the rear window, which looks quite good, but I'm a little worried. I was going to weld the hinges, bolts, and back door all together, to stop any movement under the bondy, but I remembered there is wood bolted between the door skins under the hinges, so I just went over the top. It will probably crack some time in the future..... I'll worry about it then.
I painted it, then put the stripes on, and got two suprises.
The door handle now looks OK there.
The old style Bedford nameplate that was going above the numberplate recess looked dreadful. I replaced it with the original Bedford door badge, which works very well.
Today I just wasn't in a Bedford mood. I pottered around, touching up paint, and repairing a crack that appeared in the bonnet.
The disc brakes did not get fitted.
----------------------
|
Sun 27 Jan 2008 @ 11:57
| |
|
Time in GMT
|

 New posts since your last visit
 Old post